Partitioning Databases in PostgreSQL
I’m writing this post after doing some research into this topic and finding a ton of articles written about partitioning, but nobody ever has ALL of the information needed to recreate the example they’re providing. This article DOES assume an understanding of Docker and basic usage of dockerized applications, specifically pgAdmin. (If you’ve never used it, it’s pretty straightforward).
So in this article, I want to provide everything needed to understand exactly how powerful this functionality is and how anyone can roll this into their project.
First and foremost, what exactly is partitioning and why do we want to partition.
Imagine we have a database that keeps track of cars that have driven over a certain highway. As time goes on, our database is going to get larger and larger.
When we query our database for certain data, we may have to scan the entire table which will take longer and longer. The way to get around this is to cut down our table into smaller tables, thus; partitioning!
For example, we can partition our database by time so that we can limit the size of our table. (It’s not the best example, but it’ll do!)
Setting up our database
To get easy access to a database that we can use to test, we’re going to run
docker-compose -d up on the following file:
version: '3.7'
services:
    pgAdmin:
        platform: linux/amd64
        image: dpage/pgadmin4:latest
        ports: [ '9001:80' ]
        environment: [ PGADMIN_DEFAULT_EMAIL=postgres, PGADMIN_DEFAULT_PASSWORD=password ]
        restart: on-failure
        depends_on:
        - postgresql
    postgresql:
        platform: linux/amd64
        image: postgis/postgis:16-master
        ports: [ '5432:5432' ]
        environment: [ POSTGRES_PASSWORD=password, POSTGRES_DB=postgres ]
        restart: on-failure
        command:
          - "postgres"
          - "-c"
          - "log_statement=all"
This config works on an M1 Pro Macbook, but it should work on most machines that can run Docker.
Configure Our Database
We’re going to use pgAdmin (or any other tool, but we included this one with Docker).
Execute the following script to seed our database with data:
create table traffic_data (
id varchar(255),
total_cars numeric,
measure_date date
) partition by range (measure_date);
create table traffic_data_jan_2024 partition of traffic_data for values from ('2024-01-01') to ('2024-02-01');
create table traffic_data_feb_2024 partition of traffic_data for values from ('2024-02-01') to ('2024-03-01');
create table traffic_data_mar_2024 partition of traffic_data for values from ('2024-03-01') to ('2024-04-01');
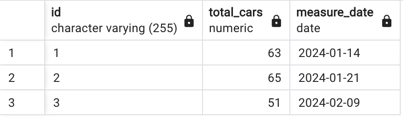
insert into traffic_data (id, total_cars, measure_date) values
('1', 63, '2024-01-14'),
('2', 65, '2024-01-21'),
('3', 51, '2024-02-09'),
('4', 59, '2024-02-19'),
('5', 42, '2024-03-03'),
('6', 46, '2024-03-26');
You should get a success message
INSERT 0 6
Query returned successfully in X msec.
We can’t see it easily yet, but our inserts seamlessly loaded into the created partitions.
What are our queries actually doing?
Now that we have our database configured, we’ll start reviewing some queries:
explain select * from public.traffic_data
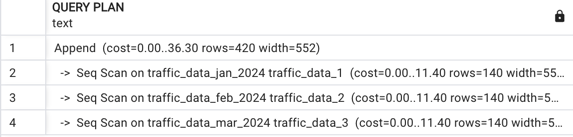
We can see that when we query the entire table, we do a sequential scan across the
entire database. Now lets throw a where clause in and see what happens!
Lets run the query select * from public.traffic_data where measure_date < '2024-02-15'
We see that we got the data we expected, but what happened in postgres?
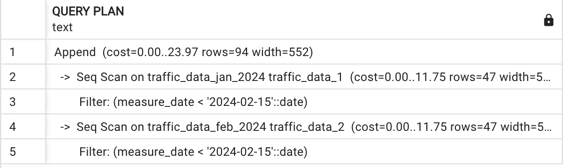
We see that we did a sequential scan of the two tables that were relevant for us, but we never scanned our third table. If we were to query a more specific date, we know that we would only scan the relevant table!

Pairing this with indexing allows us to really optimize our tables!
Takeaways
The major takeaway, besides the ability to optimize our database queries, is that
within our applications that use postgres, we can simply use the framework or library
being used to add a where clause to a query and we automatically use the correct partition.
In the same vein, we can easily insert into the root table and know that our data
is going to be pushed into the correct partition.